Request actions allows users to define a logic that is executed when the response is ready. Currently, users can assign value to a variable or store the variable. However, the variable can be extended to other use cases.

Request actions can read values from any part of the request or response. When defining actions, users can define a path to a specific value in the URL, in headers, or in the body. They can assign or store this value as a variable.
Use case: OAuth 2
In order to get an access token from the authorization server, we will:
- Sign in to the authorization server to get auth cookies
- Create a request to the authorization endpoint
- Create an action to store the token from the request URL to a variable
First, the authorization server will display the login page if you are not signed in to your account. To skip this step, we will use the Web Session feature to Log in to a web service. You can access this feature from the Request menu.
The URL can be either the authorization server’s login page or the full OAuth2 authorization URL, which should include all required parameters.


After you log in, we are ready to receive the token automatically. Use the full OAuth 2 token request URL as a request URL. It should look similar to the example below:
domain + auth endpoint + (query parameters): redirect_uri + client_id + response_type
This is the easiest scenario possible. Your example may contain more query parameters (like state or client_secret).
Here is an example of the authorization URL (please note that these are not a real parameters):
https://auth.domain.com/accounts/oauth2/authorize?redirect_uri=https://auth.advancedrestclient.com/oauth-popup.html&client_id=a12oZqF9I07AZMJec&response_type=token
Note the redirect_uri parameter. You have to set the redirect URI in your OAuth 2 settings to https://auth.advancedrestclient.com/oauth-popup.html. Otherwise, the authorization server will not allow you to redirect the request and receive the token.
If you make the request at this point, you will be redirected to the response page. Open response Details, and then click on Redirects to see that the token is in the "hash" part of the request URL.

We will use the response URL because it contains the final URL after last redirection. The URL should contain the access token in the hash part of the URL.

If you use the "hash" property in the Path to data input field, the application treats it as a query parameters string. It will only work if the hash data is formatted as a query string.
Now, when you call the endpoint it will temporarily assign the token value to the "accessToken" variable. ARC will use this value until the application restarts or until a new value is assigned.


Adding a condition
You can also instruct ARC to perform the action if certain conditions are met. You can define conditions in the Request action editor by clicking the "Add condition" button.
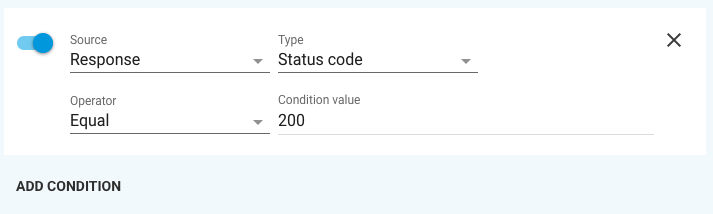
The process is similar to the Request action. You have to specify the path to the data and then specify a logical condition like equal, greater than, contains, or any other operator. Finally, add a condition value which represents the value that the app will use to compare the value from the request or from response objects to the value itself.
The action is executed only if all conditions defined for the request are met.
Both Request actions and conditions give you a powerful tool to automate tasks like requesting an authentication token or creating test resources.
You can read detailed documentation at ARC wiki pages. You will find detailed instructions for constructing the path and examples of how to use the tool.
This comment has been removed by the author.
ReplyDeleteThis comment has been removed by the author.
ReplyDeleteThis comment has been removed by a blog administrator.
ReplyDeleteThis comment has been removed by a blog administrator.
ReplyDeleteThank For sharing Valuable Information
ReplyDeleteMulesoft Training in Hyderabad
Mulesoft Online Training in India